Reversing WebAssembly with pure guesswork - Ximalaya xm encryption
Prologue
In my previous article, I left a lingering question regarding the decryption methodology inside wasm. Today, let's dive deep into the world of reverse engineering again and uncover the mysteries that lie beneath the code.
Now, some of you might wonder why this post is titled pure guesswork. Well, that's because I tackled this 'reversing' challenge without actually doing any acutally reversing.
Thinking Forward
If there exists a decryption algorithm, there must be a corresponding encryption mechanism. In this case, the exported function h in the webassembly is the encryption method I want.
Similar to its decryption counterpart, it requires two parameters: encrypted data and a trackId.
function f_h(a:{ a:byte, b:byte }, b:int, c:long_ptr, d:int, e:int) {
  var m:int;
  ...
Let's explore how this encryption works.
Guessing the encryption
First, we need a script to test how different parameters influence the encryption outcome:
from Crypto.Cipher import AES
from Crypto.Util.Padding import pad
from wasmer import engine,Store, Module, Instance,Memory,Uint8Array,Int32Array
import io,sys,pathlib
import re,base64


xm_encryptor = Instance(Module(
    Store(),
    pathlib.Path("./xm_encryptor.wasm").read_bytes()
))

def encrypt(data, key):
    stack_pointer = xm_encryptor.exports.a(-16)
    assert isinstance(stack_pointer, int)
    de_data_offset = xm_encryptor.exports.c(len(data))
    assert isinstance(de_data_offset,int)
    track_id_offset = xm_encryptor.exports.c(len(key))
    assert isinstance(track_id_offset, int)
    memory_i = xm_encryptor.exports.i
    memview_unit8:Uint8Array = memory_i.uint8_view(offset=de_data_offset)
    for i,b in enumerate(data):
        memview_unit8[i] = b
    memview_unit8: Uint8Array = memory_i.uint8_view(offset=track_id_offset)
    for i,b in enumerate(key):
        memview_unit8[i] = b
    xm_encryptor.exports.h(stack_pointer,de_data_offset,len(data),track_id_offset,len(key))
    memview_int32: Int32Array = memory_i.int32_view(offset=stack_pointer // 4)
    result_pointer = memview_int32[0]
    result_length = memview_int32[1]
    assert memview_int32[2] == 0, memview_int32[3] == 0
    result_data = bytearray(memory_i.buffer)[result_pointer:result_pointer+result_length].decode()
    return result_data

for i in range(0x20):
    data = b'A'*0x10+b"CCCCCCCC"+b"DDDDDDDD"
    # track_id = b'E'*0x8+b'F'*0x8+b'G'*0x7 # max 24
    track_id = b'\x41' * i
    # track_id = b'E'*0x8
    print(hex(i),encrypt(data,track_id))
From the results, we can observe that after track_id reaches a length of 0x18 bytes, the outcome remains the same. This implies that the length of track_id beyond 0x18 doesn't impact the results.
result
0x16 NrVlG9gtu3MmpUlXK8gIxHD0Kh07iORGc6Dz5tLaLSUBSffF0/FU1vB8OmX921rP
0x17 2HiMLe5mRt4yHMs3WUtr7L0Zt6MG/lLaeK/0rSiTeUwlTEYF2e/Y7w+S3v75Kw65
0x18 DzljUl9dgiE6eex/8OeN/DXnw0roUS9t00zDBXylzFphQ4/yMCxxOJuOPxifYEVS
0x19 DzljUl9dgiE6eex/8OeN/DXnw0roUS9t00zDBXylzFphQ4/yMCxxOJuOPxifYEVS
0x1a DzljUl9dgiE6eex/8OeN/DXnw0roUS9t00zDBXylzFphQ4/yMCxxOJuOPxifYEVS
0x18 is an intriguing value, precisely 192 bits. This instantly reminded me of aes-192 encryption. In fact, if you search "192 bit encryption" on Google, the first result typically points towards AES.
But how can we ascertain that this is indeed AES encryption? While we could manually verify it, we also need to identify the encryption mode and its IV (Initialization Vector).
I began by trying out CBC mode, primarily because it's commonly employed. Also, due to the nature of CBC mode (as detailed on Wikipedia), it's straightforward to verify it by using the initial 16 bytes as the IV.
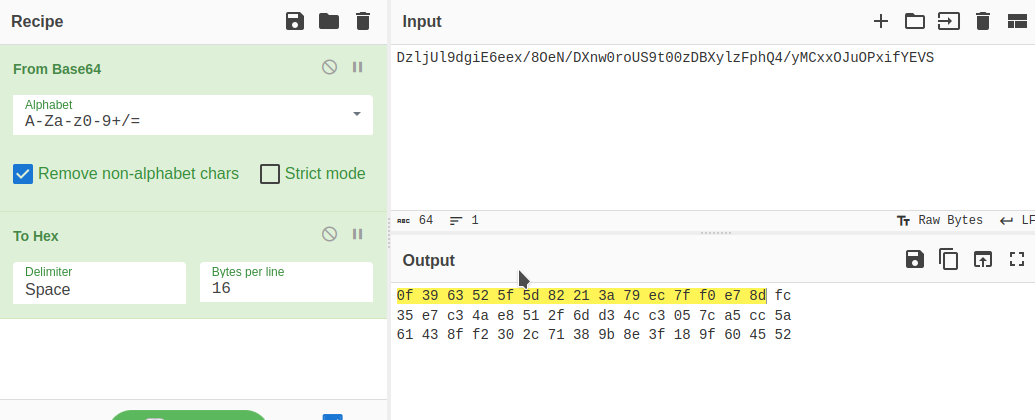
uhhhhhh, wtf, it indeed was the CBC mode (Coooooooool). Now, the task was to identify the IV.
Finding Parameters
Since the encryption function doesn't explicitly demand an IV, there are two possibilities. The IV could either be generated based on trackId (since the data would eventually be encrypted) or it could be randomly generated and then appended to the returned value.
The latter can be quickly ruled out, given the length of the return value doesn't seem to have room for an appended IV. This points to the former - the IV might be derived from the trackId. But how?
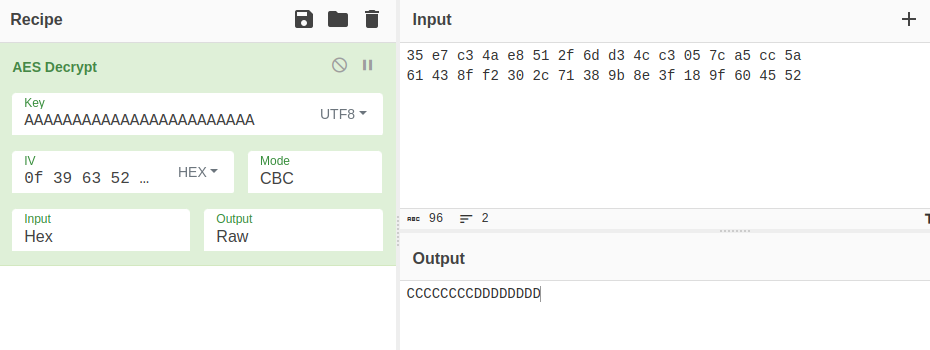
To solve this, I started with the simplest assumption: that the first 16 bytes of the trackId were being used as the IV.
LOOOOOOOL, it is same as the key. wtf is your encryption bro.
But then another challenge arose. The xm_encryptor can also process a trackId with a length less than 24 bytes. Knowing that AES-192 cannot work with a key length other than 24 bytes, I assert that the algorithm must somehow pad the trackId with some additional characters.
Our task now was to identify the padding characters and its padding method. Since the encryption needed to support variable trackId lengths and since the padding was done based on our provided trackId, the most straightforward solution would be to pad with some constant characters.
There are also two types of simplest padding methods, one is to pad behind the trackId, and the other is to pad in front.
So at this time, there is one simple but effective method - Bruteforce. One byte by one byte. We only need to run 256*24=6144 iterations. Not even hitting 10k.
xm_encryptor = Instance(Module(
    Store(),
    pathlib.Path("./xm_encryptor.wasm").read_bytes()
))

def encrypt(data, key):
    stack_pointer = xm_encryptor.exports.a(-16)
    assert isinstance(stack_pointer, int)
    de_data_offset = xm_encryptor.exports.c(len(data))
    assert isinstance(de_data_offset,int)
    track_id_offset = xm_encryptor.exports.c(len(key))
    assert isinstance(track_id_offset, int)
    memory_i = xm_encryptor.exports.i
    memview_unit8:Uint8Array = memory_i.uint8_view(offset=de_data_offset)
    for i,b in enumerate(data):
        memview_unit8[i] = b
    memview_unit8: Uint8Array = memory_i.uint8_view(offset=track_id_offset)
    for i,b in enumerate(key):
        memview_unit8[i] = b
    xm_encryptor.exports.h(stack_pointer,de_data_offset,len(data),track_id_offset,len(key))
    memview_int32: Int32Array = memory_i.int32_view(offset=stack_pointer // 4)
    result_pointer = memview_int32[0]
    result_length = memview_int32[1]
    assert memview_int32[2] == 0, memview_int32[3] == 0
    result_data = bytearray(memory_i.buffer)[result_pointer:result_pointer+result_length].decode()
    return result_data

fillup = []

for missing in range(1,0x18+1):
    data = b'A'*0x10+b"CCCCCCCC"+b"DDDDDDDD"
    key = b'\x41'*(0x18 - missing)
    for i in range(256):
        test_byte = i.to_bytes(1,"little")
        # filledup_key = key + b''.join(fillup) + test_byte
        filledup_key = b''.join(fillup) + test_byte + key
        try:
            result_data = encrypt(data,key)
            cipher = AES.new(filledup_key, AES.MODE_CBC, filledup_key[:16])
            decoded_data = unpad(cipher.decrypt(base64.b64decode(result_data)),16)
            assert data == decoded_data
            fillup.append(test_byte)
            print("found", fillup)
            break
        except Exception as e:
            pass
    assert len(fillup) == missing


print("found filled up: ", b''.join(fillup))
lets start with the first one. padding after the trackId, ummmmmmmmmmmmmmmmmm. not this time.
[aynakeya @ ThinkStation]:~/workspace/ximalaya
22:51:38 $ python test_wasm_3.py
Traceback (most recent call last):
  File "/home/aynakeya/workspace/ximalaya/test_wasm_3.py", line 59, in <module>
    assert len(fillup) == missing
AssertionError
But the second approach, padding before the trackId, worked.

[aynakeya @ ThinkStation]:~/workspace/ximalaya
23:16:55 $ python test_wasm_3.py
found [b'1']
...
found filled up:  b'123456781234567812345678'
Verify Parameter with Memdump
To validate the padding method is accuracy, another technique I can employ is the memory dump. While debugging would work too, I'm just too lazy to debugging WebAssembly.
To achieve this, I added a few lines to the encrypt function:
result_data = bytearray(memory_i.buffer)[result_pointer:result_pointer+result_length].decode()
a = bytearray(memory_i.buffer)[0:track_id_offset*3]
off = a.find(key)
print(a[off-0x20:off+0x20])
By examining the output, we can clearly identify the padding:
bytearray(b'}\x11\x00@\x00\x00\x00@\x00\x00\x00\xe8\x01\x11\x00X}\x11\x00@\x00\x00\x00@\x00\x00\x00\x10\x00\x00\x00\x00\x00\x00\x00X}\x11\x00@\x00\x00\x00\x10\x00\x00\x00\x00\x00\x00\x00AAAA@\x00\x00\x00\x10\x00\x00\x000\xa4\x0e\x000\x00\x00\x00\x00\x00\x00\x00\x10\x00\x00\x00\xa8\x00\x11\x00p\x08\x10\x00123456781AAAAAAAAAAAAAAA123456781AAAAAAA123456781AAAAAAAAAAAAAAA123456781AAAAAAA\xe8\x01\x11\x000\x00\x00\x000\x00\x00\x00AAAA\x08\x00\x11\x00 \x00\x00\x00 ')The presence of sequences like 123456781AAAAAAAAAAAAAAA in the dumped data suggests that our assumption regarding the padding is indeed accurate.
Put it together
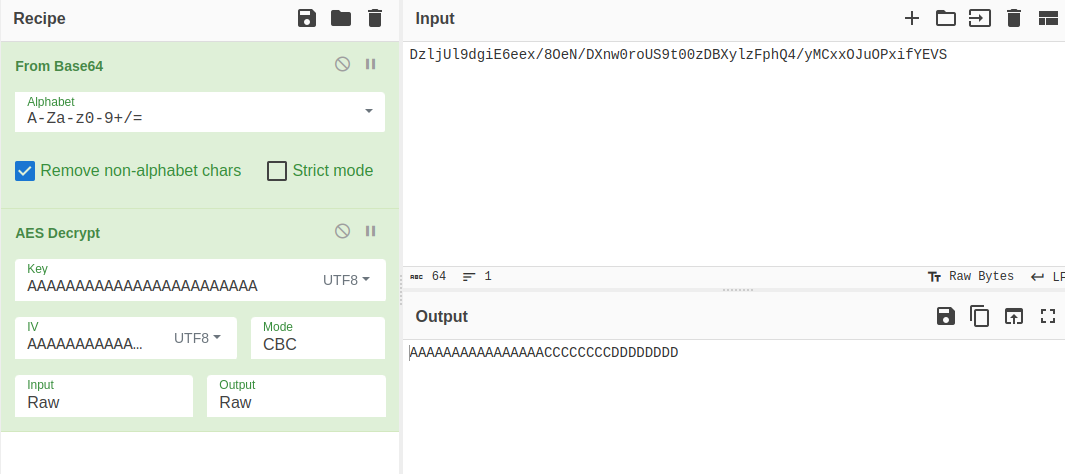
With all the pieces of the puzzle now in place, it's clear that the wasm encryption follows these steps:
- Decode the input with Base64.
- Use AES-192-CBC encryption. The key is derived from
trackId. IftrackIdhas fewer than 24 bytes, it's prepended with123456781234567812345678to reach the required length. And the IV is the first 16 byte of the key. - Encode the result using Base64.
Walking Backwards
Having understood the correct encryption method, I took a moment to ponder whether there might be a more straightforward reverse engineering approach.
I wasn't keen on trawling through WebAssembly. Just then, one user from some git issue mentions that the older version of the Ximalaya client used a DLL to implement the encryption, and more importantly, the encryption mechanism was identical.
Hey, I don't need to deal with the stupid WebAssembly anymore. I could now dive straight into dissecting the algorithm using the my good old assembly code. Well, at least that's what I initially thought.
The Golang DLL
I did take some time dived into reverse engineering - mainly because the dll was crafted using Golang . While the world of assembly offers its intricate dance of registers and memory locations, it became exponentially challenging with Go's binaries, thanks to its distinctive calling convention.
For those unfamiliar, a calling convention defines the runtime call stack's operation, dictating how functions receive parameters from their callers and return their results. Typically, languages like C or C++ adhere to conventions that is fairly easy to use and understand. Enter Golang - a language that not only dances but also brings its own dance floor. Unlike its peers, Go uses a unique, stack-based calling convention, throwing a wrench into the familiar rhythm of traditional reverse engineering tools.
What does this mean for reverse engineers? Pure Pain.
Standard tools like IDA Pro, Ghidra, or Radare2 can get pretty confused by Go's conventions. Recognizing function boundaries, arguments, and return values becomes an uphill battle. Local variables and function arguments are frequently intermixed, and because Go binaries are statically compiled, there's a whole lot of code to sift through.
But every dark cloud has a silver lining.
Instead of wrangling with Go's intricacies head-on, an alternative approach dawned upon me: why not write a similar AES decryption function in Go, compile it with debugging symbols, and then use that as a basis for comparison with the target binary? By doing this, I'd have a "known" reference, a roadmap of sorts, to guide my analysis of the original DLL.
The process was fairly straightforward. I wrote an AES decryption method in Go, ensuring it closely mirrored the suspected functionality of the target DLL. Upon compiling this with debugging symbols, I was armed with a binary rich in annotations that helped demystify the corresponding sections of the DLL.
package main

import (
	"crypto/aes"
	"crypto/cipher"
	"encoding/base64"
	"errors"
	"fmt"
)

func pkcs7UnPadding(data []byte) ([]byte, error) {
	length := len(data)
	if length == 0 {
		return nil, errors.New("error data")
	}
	unPadding := int(data[length-1])
	return data[:(length - unPadding)], nil
}


var iv = []byte("1234567890123456")
var key = []byte("1234567890123456")

func AesDecrypt(data []byte) ([]byte, error) {
	block, err := aes.NewCipher(key)
	if err != nil {
		return nil, err
	}
	blockMode := cipher.NewCBCDecrypter(block, iv)
	crypted := make([]byte, len(data))
	blockMode.CryptBlocks(crypted, data)
	crypted, err = pkcs7UnPadding(crypted)
	if err != nil {
		return nil, err
	}
	return crypted, nil
}


func DecryptByAes(data string) ([]byte, error) {
	dataByte, err := base64.StdEncoding.DecodeString(data)
	if err != nil {
		return nil, err
	}
	return AesDecrypt(dataByte)
}

func main() {
	a, b := DecryptByAes("asdfsadfsadf")
	fmt.Println(a, b)
}
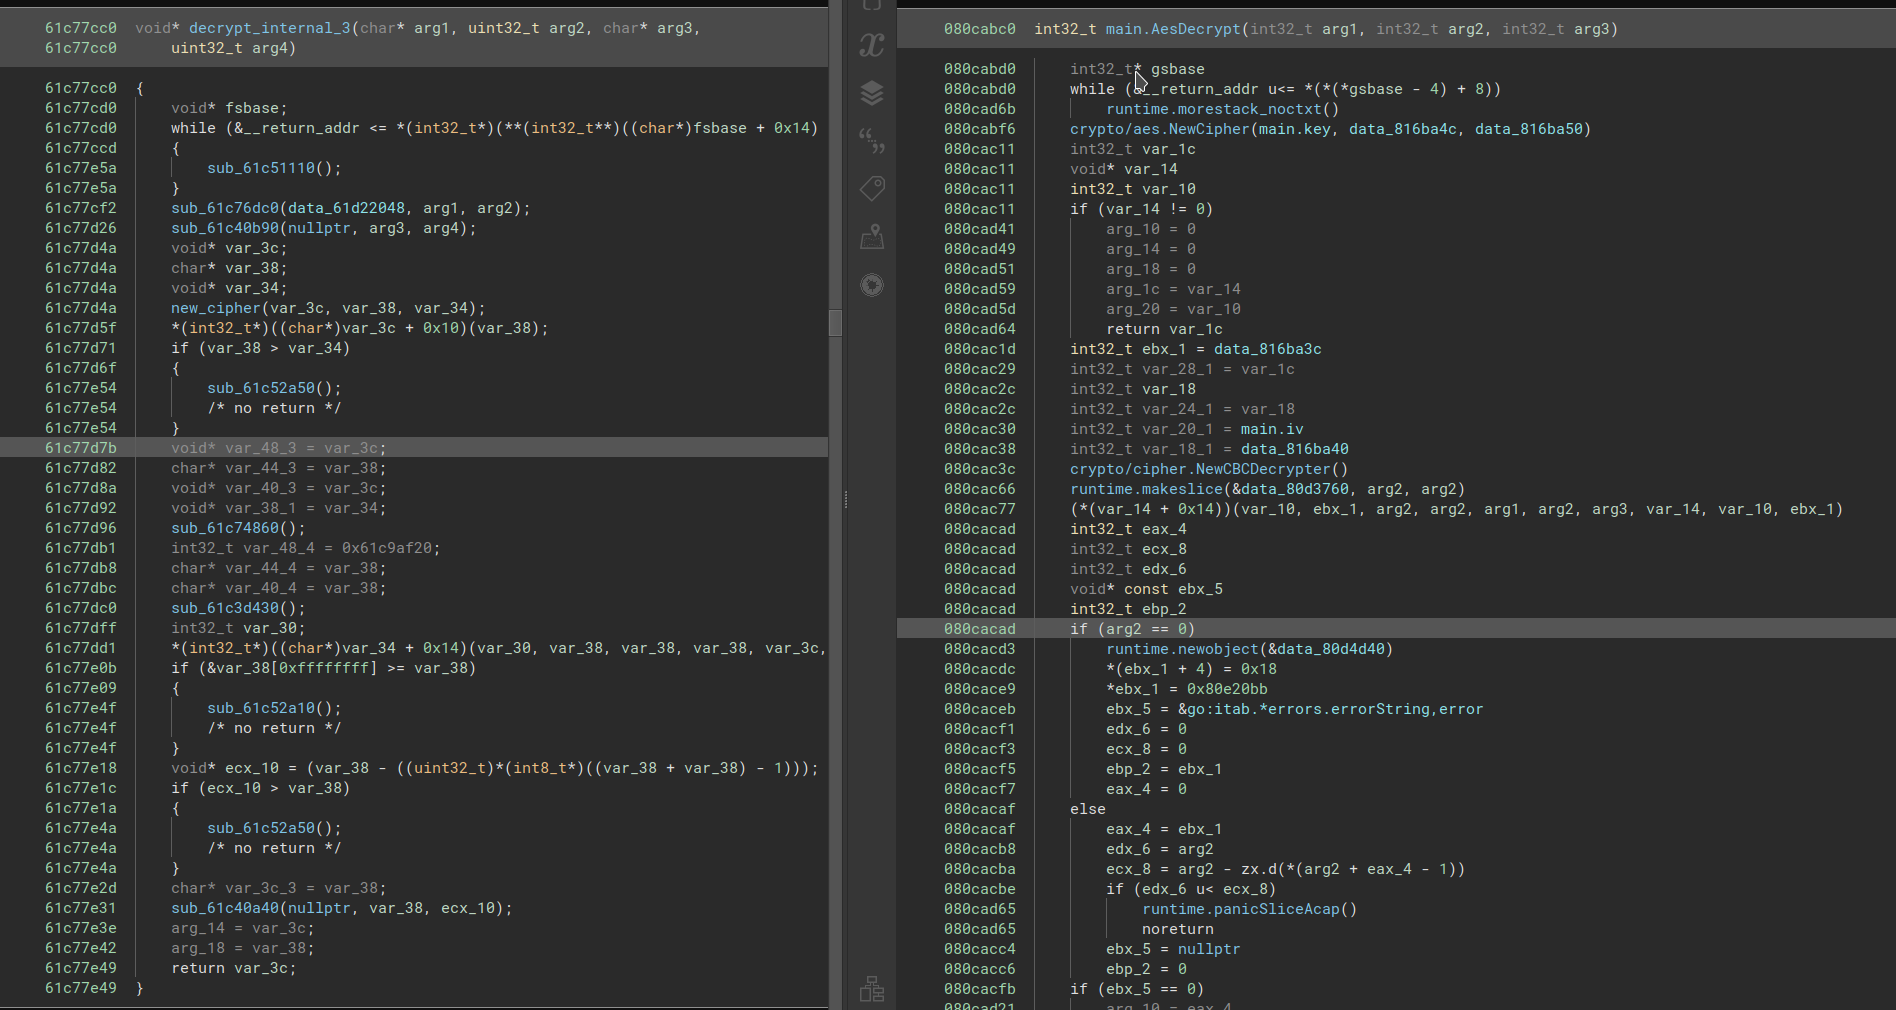
Using my custom-compiled Go binary as a reference, I could now align and correlate patterns, function calls, and data structures more effectively with the DLL. This comparative approach illuminated the obscured parts of the DLL, allowing me to make headway much faster than if I had been grappling with the unfamiliar Go assembly on its own.
Here's the key padding:
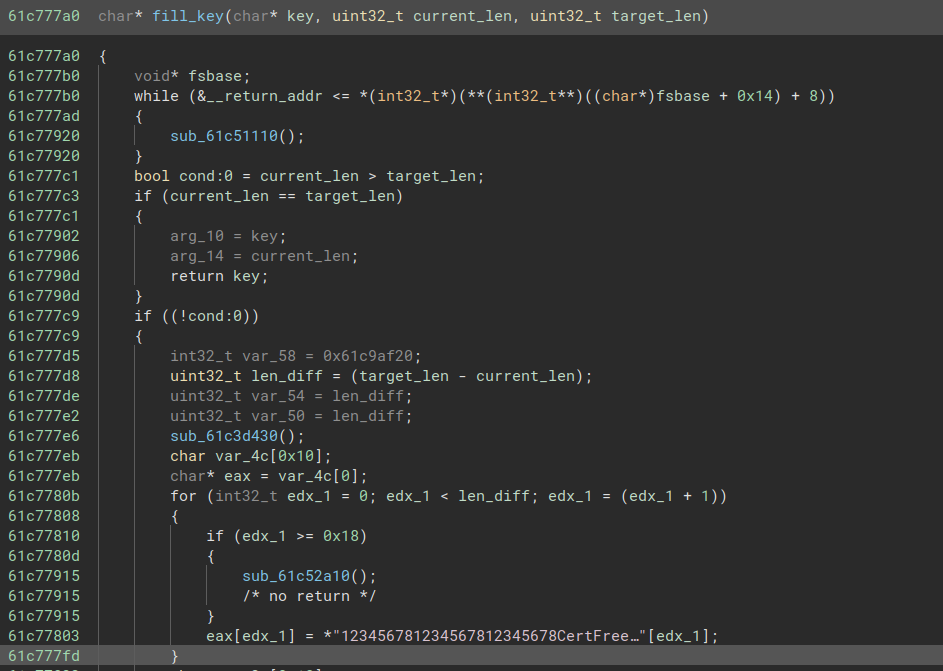
Debugging
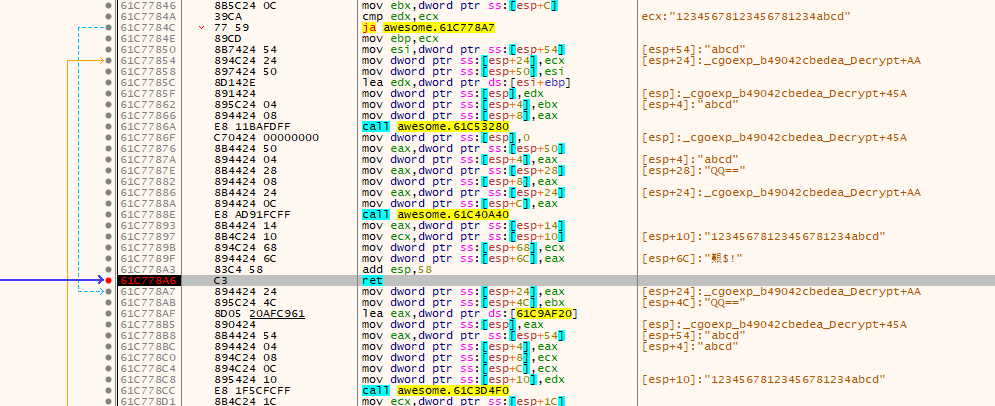
Another approach is to create a C program that calls the binary. This way, I can engage in debugging to uncover the inner workings of the fill_key function and understand its behavior more effectively.
#include <stdio.h>
#include <stdlib.h>
#include <string.h>
#include <stdint.h>
#include <windows.h>

// Define the function signature
typedef char* (*DecryptFunction)(char*, uint32_t, char*, uint32_t);

int main(int argc, char *argv[]) {
    HINSTANCE hLib;
    DWORD error;

    hLib = LoadLibrary("awesome.dll");
    if (hLib == NULL) {
        error = GetLastError();
        printf("Error loading awesome.dll (error code: %d)\n", error);
        return 1;
    }

    printf("load awesome.dll success\n");
    // Get a pointer to the decrypt() function
    DecryptFunction decrypt_func = (DecryptFunction) GetProcAddress(hLib, "Decrypt");
    if (decrypt_func == NULL) {
        printf("Error getting Decrypt function address\n");
        return 1;
    }

    // Test call
    char value[0x50] = "QQ==\x00"; // Just for demonstration
    char key[0x50] = "abcd\x00"; // Just for demonstration
    printf("ready to execute\n");
    char* result = decrypt_func(value, 4, key, 4);
    printf("ok\n");

    printf("Result: %s\n", result);

    FreeLibrary(hLib);
    return 0;
}
After all, the results of the proper reverse engineering were very consistent with my guesswork solution.
Some Thoughts
Sometimes, when confronted with a perplexing problem, it's beneficial to shift gears. Using an informed approach to make educated guesses can be far more productive than blindly grappling in the dark. Instead of hitting the wall repeatedly, stepping back and reassessing can often open doors to solutions previously unseen.
The age-old wisdom of "Don't put all your eggs in one basket" rings true here. Diversifying your strategies can save you from potential pitfalls and lead you to your eureka moment faster than you might think.
All in all, the joy of conquering a formidable challenge is incomparable. Those fleeting moments of doubt now serve as milestones marking how far I've journeyed, filling me with a profound sense of achievement.
Code
from mutagen.easyid3 import ID3
from Crypto.Cipher import AES
from Crypto.Util.Padding import pad,unpad
import io,sys,pathlib
import re,base64,magic
import mutagen


class XMInfo:
    '''
    const {
        title: s,
        artist: l,
        subtitle: c,
        length: d,
        comment: {
            language: u,
            text: p
        },
        album: h,
        trackNumber: b,
        size: g,
        encodingTechnology: v,
        ISRC: _,
        fileType: y,
        encodedBy: w,
        publisher: k,
        composer: x,
        mediaType: S
    }
    '''
    def __init__(self):
        self.title = ""
        self.artist = ""
        self.album = ""
        self.tracknumber = 0
        self.size = 0
        self.header_size = 0
        self.ISRC = ""
        self.encodedby = ""
        self.encoding_technology = ""

    def iv(self):
        if (self.ISRC != ""):
            return bytes.fromhex(self.ISRC)
        return bytes.fromhex(self.encodedby)

def get_str(x):
    if x is None:
        return ""
    return x

def read_file(x):
    with open(x,"rb") as f:
        return f.read()

# return number of id3 bytes
def get_xm_info(data:bytes):
    # print(EasyID3(io.BytesIO(data)))
    id3 = ID3(io.BytesIO(data),v2_version=3)
    id3value = XMInfo()
    id3value.title = str(id3["TIT2"])
    id3value.album = str(id3["TALB"])
    id3value.artist = str(id3["TPE1"])
    id3value.tracknumber = int(str(id3["TRCK"]))
    id3value.ISRC = "" if id3.get("TSRC") is None else str(id3["TSRC"])
    id3value.encodedby = "" if id3.get("TENC") is None else str(id3["TENC"])
    id3value.size = int(str(id3["TSIZ"]))
    id3value.header_size = id3.size
    id3value.encoding_technology = str(id3["TSSE"])
    return id3value

def get_printable_count(x:bytes):
    i = 0
    for i,c in enumerate(x):
        # all pritable
        if c < 0x20 or c > 0x7e:
            return i
    return i

def get_printable_bytes(x:bytes):
    return x[:get_printable_count(x)]

def xm_decrypt(raw_data):
    # decode id3
    xm_info = get_xm_info(raw_data)
    print("id3 header size: ",hex(xm_info.header_size))
    encrypted_data = raw_data[xm_info.header_size:xm_info.header_size+xm_info.size:]

    # Stage 1 aes-256-cbc
    xm_key = b"ximalayaximalayaximalayaximalaya"
    print(f"decrypt stage 1 (aes-256-cbc):\n"
          f"    data length = {len(encrypted_data)},\n"
          f"    key = {xm_key},\n"
          f"    iv = {xm_info.iv().hex()}")
    cipher = AES.new(xm_key, AES.MODE_CBC, xm_info.iv())
    de_data = cipher.decrypt(pad(encrypted_data, 16))
    # Stage 2 xmDecrypt = (base64 decode => aes-192-cbc => base64 encode)
    print(f"decrypt stage 2 (xmDecrypt):\n"
          f"    data length = {len(de_data)},\n"
          f"    key = {str(xm_info.tracknumber)}")
    stage_2_data = base64.b64decode(get_printable_bytes(de_data))
    assert len(stage_2_data) % 16 == 0
    key = str(xm_info.tracknumber).encode()
    key = (b'12345678'*3)[:0x18-len(key)] + key
    cipher = AES.new(key, AES.MODE_CBC, key[:16])
    stage_2_data = unpad(cipher.decrypt(stage_2_data),16).decode() # idk but workround
    # Stage 3 combine
    print(f"Stage 3 (base64 combination):\n"
          f"    technology = {xm_info.encoding_technology}")
    decrypted_data = base64.b64decode(xm_info.encoding_technology+stage_2_data)
    final_data = decrypted_data + raw_data[xm_info.header_size+xm_info.size::]
    return xm_info,final_data

def xm_decrypt_v12():
    pass

def find_ext(data):
    exts = ["m4a","mp3","flac","wav"]
    value = magic.from_buffer(data).lower()
    for ext in exts:
        if ext in value:
            return ext
    raise Exception(f"unexpected format {value}")

def decrypt_xm_file(from_file,output=''):
    print(f"decrypting {from_file}")
    data = read_file(from_file)
    info, audio_data = xm_decrypt(data)
    if output == "":
        output = re.sub(r'[^\w\-_\. ]', '_', info.title)+"."+find_ext(audio_data[:0xff])
    buffer = io.BytesIO(audio_data)
    tags = mutagen.File(buffer,easy=True)
    tags["title"] = info.title
    tags["album"] = info.album
    tags["artist"] = info.artist
    print(tags.pprint())
    tags.save(buffer)
    with open(output,"wb") as f:
        buffer.seek(0)
        f.write(buffer.read())
    print(f"decrypt succeed, file write to {output}")

if __name__ == "__main__":
    if len(sys.argv) < 2:
        print("Usage: python decrypt_xm.py [<filename> ...]")
    for filename in sys.argv[1::]:
        decrypt_xm_file(filename)